Sunday 31 January 2016

Babies/Children

I am really pleased how this card turned out, everything just clicked together beautifully. Not as full as I normally do, but what's there is 'enough'.

This image is adorable.

Although I did have to cheat - no cream cardstock, so had to use cream paper as the background!

 
Lunagirl image (freebie?)
doily (cut in half)
promarker - pastel blue & pastel pink
Hobbycraft flower
Hobbycraft green pearls


Saturday 30 January 2016

one layered card

 
DoCrafts "Folk Christmas"
Crafts-too  Feather Touch marker pens
Black pigment ink
Glam Gold
 
Using the black pigment ink I stamped the image onto a 4by4 card blank, waited a few moments and then over coloured the image with the feather touch markers, these have two nibs - one feathered and one ballpoint. I used both on different parts of the card.
The noel and the little stars were stamped using the Glam Gold. 


unusual shaped card/over the edge

Two for the price of one this afternoon, part of my prize pack from Mrs A, was a precut Butterfly shape card. So it was the perfect choice for one of the Gecko Galz challenges over on Facebook and once I'd finished it, I realised that it would fit the 'over the edge' challenge also.

 
Gecko Galz "Victorian Spring" papers no 7
Sticko  flowers
Tattered Lace mini dies
Hobby House - Light Blue and Sea Blue
Hobbycraft green pearl gems
Sentiment CAP2
 
 
entered into: Gecko Galz Papercrafting Challenge Group
                     Butterfly Challenge = O for over the edge
 

Tuesday 26 January 2016

Hearts

An atc done for Wicked Wednesday, an atc only challenge. This weeks theme was hearts.

I had another half done, but Daisy the cat, jumped up on the table and knocked my full cup of coffee all over it! Full cup!!!!!!

This time I decided to hunt through my bits n bobs drawer and found this embellishment, which Is from a donated bag of cards a friend gave me, save her going to the recycling centre with them.

 
Gold, bronze and red inks
doily
 
I edged the atc with the red ink then smudged it inwards, then I used gold ink to fill in the middle, only it was very light so I swapped to the bronze which I lightly smudged. Using the doily as a template I pressed the inked sponge on top to print ink through the small holes leaving a pattern on the atc, repeated this a couple of times in random places to fill the space. Finally I stuck the hearts on.
entering in:

Space Oddity

Over at Digitally Sweet this months challenge is a colour one,


Perfect for todays weather, very windy and quite cold, You can imagine being at the coast and watching those waves crash against the cliffs with the biting sea air whipping around your face.
 
So here's my entry, I actually made this about a week ago, once all the furore had settled down about David Bowie sadly passing away,  and have only just got round to blogging it.
 
The image and the words from Space Oddity just work together.
 
Its a simple piece, the only really fiddly bit was getting rid of the writing, situated bottom left of the image which is actually an old advertisement for Buchans Carbolic Soap, and was a freebie from Fripperies and Butterflies, go check out her blog - beautiful makes, designs, ideas and the odd freebie.
 
And this one is 100% digital.


Using CAP2, I imported the image to fit half my workpage and then Using photolab I removed the background of the image, leaving the moon & lady visible, and placed her on the left so I could write on the page. I used the eraser tool to rub out the wording at her feet.
I had already copied the resized image, and so cropped the image till only the sky was showing and then used that to fill the remaining of the page, using it more like a stamp I guess, especially when covering the 'rubbed' out words, had to blend the edges in a couple of areas to make it look like the sky was one piece.
Then picking the colour up from the paint swatch, used the words of the song


Monday 25 January 2016

All that Glitters

This card made itself.

Yes, it did.

Because I had no idea what I was going to do for this challenge, apart from using this very beautiful lady from the Breathtaking Beauties image sheet.

I used CAP2 to resize her, and printed her out.

And that was it.

So, somehow - the velum was found, then the right colour paper was found to go underneath so you could see the pretty swirls better on said vellum, and the colour tone matched the vintage look.

I admit to using the doily.


Strip of lace, feather off of a Fairy Angel light, ribbon, flower embellishments, gems and the die cuts just happened.

The little flowers on the feather were white, so they coloured themselves Cool Grey to match up.

Do I need to call Mulder & Scully........well, maybe just Mulder?


purple blue paper
Laurence Llewelyn Bowen (yes, I had to google how to spell it) Vellum
doily
Gecko Galz 'Breathtaking Beauties'
Crafty Blitz small white flowers
Ribbon
Hobby House 'champagne' gems
Do Crafts stamp.
Do Crafts corner die
snippets of brown design paper from The Works.


obligatory Laurence pic


Entering in: Gecko Galzs = All that glitters
                    Snippets Playground = -week 213


Sunday 24 January 2016

birthday

I had so much fun making the cute little calendar cards, I decided to make one for Andrews birthday.

 
Gecko Galz Steampunk Papers - Picture It
plane from Google search
washers
 
Using CAP2 I resized the backing paper, then imported the image and used the photo editor to blank out the white space surrounding the image, then turned it sepia to match the tones. I picked a font that I thought matched the theme of the card and printed the words out separately.
 
Ah! the words...... bit of an odd choice for a vintage by-plane, don't you think?? Well, yes but their referencing one of our favourite films 'The Mummy'.
 
I kept everything to scale and printed onto an A4 card, then assembled the front of the card whilst it was flat - using a promarker to go round the edges of the sentiments to make them stand out. The two washers came out of a tin full of diy bits and bobs.
 
Last thing to do was refold and glue.

Saturday 23 January 2016

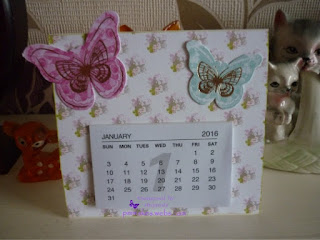
little calendars

 Spotted this little folded desk top calendar on Pinterest, if I find it again I will link to the ladies blog.

The top one was a tester, so I kept it for myself - of course I had to add b'flies too it ; )

The bottom one, I did for Judith Ann, my January partner swap over at CardExhange UK.


It folds flat for postage so its perfect for those moments when you want to send out a 'hello' or 'just thinking of you' card.

 
card measurements:   4.25inch by 11inch
 
score along the long side at 4, 8, 9 and 10 inch

Friday 22 January 2016

Hot Beverage

On a roll with the Christmas cards, this the 3rd week... I promise I won't be counting up every week but its still a novelty *lol*

For some reason this looks a bit blurry.

 
topper/green paper/sentiment from Nigel Mays 'Craft into Christmas' Cool Yule cd
everything else from NitWit Collection "Cookin' Cookies"
green shiny xmas twine
Hobby House taupe gems.
 
Very easy card, printed off a design sheet with topper & embellishments on, didn't use any of the embellishments though, cut out, layered up, chose matching papers from NitWit paper pack and stuck down, voila - card!


Thursday 21 January 2016

I is for ink

Following on from the atc, this is the card I was doing when the idea of the background for the atc popped up.

I spotted a card somewhere on the grand old web which had a similar design effect and thought that would look nice on card for 'I is for ink', but because I didn't have a stamp design like that, I had to come up with an alternative............ bubble wrap!

 
piece of bubble wrap
Stazon Blazing Red, Vibrant Violet and Jet Black inks
HobbyCraft white pearls
Create and Craft sentiment stamp
 
I inked the bubbles up a couple of times with the Red and then pressed the wrap to the card with a little bit of pressure to ensure (ie hope) it printed and then carefully peeled it off.
I wiped the remaining ink off the bubbles and repeated the process with the Violet.
 
Before I stuck the backing paper down, I inked the edges of it with the Violet.
 
Using the B'fly die, I cut two from the white card snippets in my stash, and sponged the Violet ink over them, this is where I had the idea for the atc as it left a lovely white outline surrounded by the smudged ink on the scrap.
 
Placed the b'flies onto the design and glued down so the wings were raised up slightly, then stuck the gems on them.
 
Finally I stamped the sentiment on.
 
Pretty simple card, looking at it now, I think next time I won't use as much ink on the bubblewrap and make it look more faded.
 
I didn't put an insert in, but I did use the same technique using a Tattered Lace mini b'fly die and the Violet ink.
 
As this is going to be a birthday card to a friend and I had already wrote in it before taking the photo, I have rubbed out the wording.


Update - I now have a similar designed stamp which came free with the latest issue of DoCrafts. Happy coincidence ; )
 
entering in: Butterfly Challenge - I is for ink
                   Pixies Snippets Playground = week 212


Tuesday 19 January 2016

Make it sparkle

Had planned to make this atc yesterday, but after a receiving a phone call from work regarding potential staff cuts, I couldn't get into the creative mood. Although through boredom in the evening I ended up watching 'how to' crochet and giving that a whirl. Mmm, that may take some while.

So, today my muse was back and welding sticky tape and scissors!

Now this atc is a spoiler for a card I have made for the Butterfly Challenge this week, as I had an idea for this background whilst doing something for the card front. More on that tomorrow...

Butterfly die cut
Papermania Holographic embossing powder
Woodware purple gems
Background - Stazon ink 'Vibrant Violet'
Leaves stamp by 'From the Heart' Jenny Ellory
Inkadinkado Glam Gold ink
Enchanting stamp from 'Fairy Belle Collection' by Jodie Lee Designs
Encore Metallic Bronze ink
I die cut two butterflies, one for the template and one to use. I pressed the template to the card with one finger and very carefully, using a sponge dabbed the violet across the butterfly and its surrounding area till I was happy with the effect.

I then stamped the leaves onto the background, making sure not to go over the white outline.

I then stamped over the 2nd butterfly with clear ink for embossing, and used the holographic powder.

Once the butterfly was done, I used silicone glue to stick it onto the atc, I used a big blob of it, right down the body of the butterfly so it raised it up so you could see the white outline underneath.


As the glue was drying, I stuck 4 purple gems onto the B'fly. Last thing to do was stamp the sentiment in the top left corner, which I should have done BEFORE gluing the b'fly *lol*


Thursday 14 January 2016

decoupage

The first partner swap of 2016 for Card Exchange UK over on Yahoo groups, we're a small, friendly group who swap cards each month with a delegated partner, we also do themed card swaps, atcs etc. The partner swap is obligatory but any others are optional. If you're interested pop over and join us!

This month I wanted to do something different and I haven't done decoupage for a while, so I grabbed my folder and had a look through, finally settling on this subtle scene of flowers with small village in the background.
Its being posted so I only did one level of decoupage.

 
Le Suh decoupage
Hobby House 'olive green' gems
DoCrafts Designer Die Cuts (made into a topper)
'Antique Pinks' backing paper
Doily


Ooops, I did it again

Well, week 2 of me joining in over at Merry Monday Christmas Challenge - the weather as turned very cold and snow is forecast in some areas over the weekend so it doesn't seem strange yet to be making Christmas cards.
 
I did struggle to make a card to fit the Plaid theme, as I have no plaid in my stash......not even a ribbon, but as it happens I was looking thorough my computer files for another challenge and came across this lovely little girl all muffled up against the cold AND wearing a plaid skirt! Woo!!


background paper Kaisercraft - Christmas Collection
half a Doily
Gecko Galz image from newsletter freebie
DoCrafts die cut sentiement coloured with Almond promarker
flower from stash
Anitas Glitterations snowflake peel off
Hobby House taupe gem
X cut corner punch
 

Friday 8 January 2016

butterfly 2

As you know I was the Guest Designer over at the current Butterfly Challenge,  and I made this as my sub, I had a birthday card to do today so I kept with theme of the challenge
Again its another first, as Santa bought me a Raspberry embossing plate for Christmas, so I played with that.

 
Tattered Lace mini dies - butterflies
free embossing strip from a magazine
Create and Craft Happy Birthday stamp
Hobby house 'Taupe' gems
Inkadinkado pigment ink 'Glam gold'
yellow paper from stash


Thursday 7 January 2016

white on white

New Year, another new first - a Christmas card in January!!

As I always leave my cards till the very last moment, then give up and buy, I decided I was going to try and enter Merry Monday every week, obviously to get ahead on the Christmas card front but also to meet new crafters and see their lovely work and be inspired.

So, here goes -

my entry for the white on white challenge, now I don't often do this colour because I'm quite an untidy crafter and always end up with a smudge or dirty mark on the card OR one of my cats decides to jump on the craft table and leave a paw print behind.

But this time nothing untoward happened to me, the card or the cat!

 
6x6 card
assorted white papers
snowflake punch
Do crafts Christmas sentiment stamp
Spellbinders Decorative Diamonds (number 2 die)
Inkadinkado pigment ink Glam Gold
White gems
 
 
Now all I need to is put it away safe and remember where I put it. When I go to the shops next, I will look at box folders/storage - I already need a set of little drawers to put all my butterfly stuff in, probably could do with one for my flowers..........